Self Supporting Awning
- The Sportliner itself can be opened up in seconds, but putting up the awning can take quite some time, and of course involves not only the canvas itself but poles (3), guy ropes (6), guy rope runners (6), pegs (6) and preferably guy rope tension absorbers (6).
- With the awning fitted, inside the Sportliner can feel claustrophobic, and any view out on that side of the van is all but lost.
- It is not uncommon to find oneself tripping over the ropes, especially when coming back to the van in the dark after a social gathering in the camp kitchen!
Seeing a photograph of a self supporting awning on the USA Aliner Club website caused the grey cells stir. Also, having close
friends owning a Jayco pop-top with integral pull out blind, and who take great
delight in demonstrating the simplicity of their system, helped give us the
necessary final nudge to see what we could come up with.
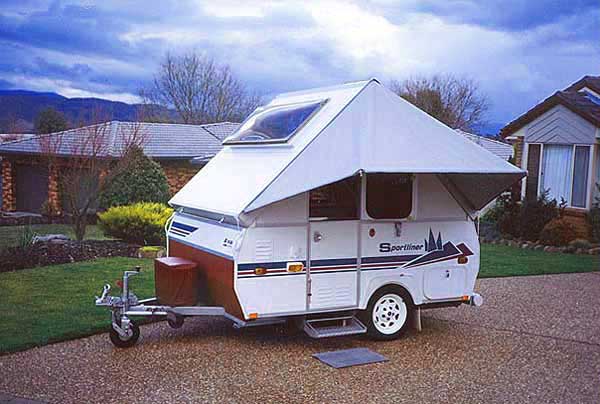
Self Supporting Awning on Sportliner
The dimensions are based on what we felt we needed, and what looked balanced on the Sportliner. The canvas was made up to our drawings covering the requirements by a canvas products fabricator. Aluminium tubing attached to the van in three places provides the necessary support for the canvas. The three lower tubes sit in pockets in the canvas, whereas the two top tubes lie under the canvas.
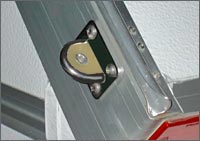
Attachment of the tubing to the van is via three heavy duty eye plates, one at the roof apex and one each at the roof lower
corners :
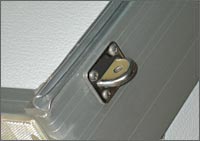 Front Eye Plate |
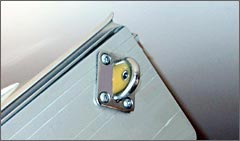 Top Eye Plate |
 Back Eye Plate |
The hole in each eye contains two 6 mm nuts
(on top of each other), potted and held in place with two-part Super Strength
Araldite® as shown in the photographs.
An eye bolt into the 6 mm nuts secures the tubes to the van at each point.
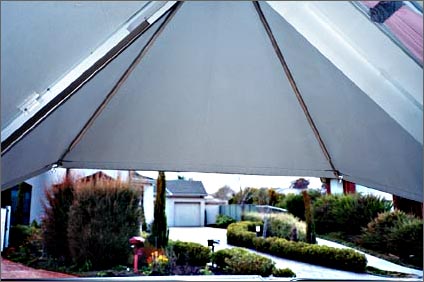
View From Inside (van side not erected for clarity)
Our preferred method of putting up the awning is as follows:
- Open up the canvas and lie it on the ground with the rear roof Velcro part uppermost.
- Fold the rear roof part over on top of the front roof part.
- With the A'van roof closed down, place the folded canvas over the closed part of the A'van rear roof.
- Pull the rope stitched on the front part of the canvas through the front roof "sail track" up to the point where the apex eyelet in the canvas can slip over the "peg" at the apex of the front roof. Secure by pulling out the "latch" in the peg to where it can swivel across the peg and secure the eyelet in place
- Pull the rope stitched in the rear part of the canvas through the shorter length of "sail track" on the rear roof. Press the canvas flap at the roof top onto the top Velcro strip and onto the strip which runs down from the roof apex to the rear "sail track".
- Raise the A'van roof and sides
- Loosely fix the two top tubes to the A'van top fixing eye plate.
- Slide the lower middle tube into the canvas "pocket".
- Slide the two lower end tubes into the canvas "pockets", loosely fixing the van ends to their respective fixing eye plates.
- In turn, attach the two top tubes to the two lower corners and tighten up all the fixings.
- If necessary, adjust the turnbuckles (part of top tubes) to tension the canvas.
No tools are required as all "fixing" uses
eyebolts and wingnuts, which can be tightened and loosened by hand.
So far, we have found the arrangement adequately rigid, and completely
satisfies our requirements. However, should additional bracing be needed
in very gusty weather, a guy rope from each of the two outer corners should
suffice.
Website URL "actavanning.org/index.html"